VITA Zahnfabrik
H. Rauter GmbH & Co. KG
Spitalgasse 3
79713 Bad Säckingen

Systematic Shade Reproduction Using VITA VMK Master Veneering System
Providing patients with different types of restorations in the anterior area is a big challenge. In such cases, manufacturing processes, framework materials and wall thicknesses must be intelligently coordinated so that the entire restoration is integrated harmoniously into the natural dentition. This requires veneering porcelain that can be applied intuitively, and is flexible with a high shade fidelity. In addition, these ceramics must allow both a simple base layering, as well as the reproduction of all facets of the individual shade and light play. Dental Technician Marcio Breda shows us how he restores the esthetic zone with metal-ceramic crowns and full ceramic non-prep veneers using the ceramic veneering system VITA VMK Master (VITA Zahnfabrik, Bad Säckingen, Germany).
1. Complex initial situation
A 34-year-old female patient presented in our practice after being referred by Dr. Henrique Breda Rafalski. She was unhappy with the esthetic appearance of her upper front teeth. The metal-ceramic crowns on front teeth 11 and 21 looked lifeless and exhibited a deficient shade integration. The tooth axis, the contour of the incisors and the curve of the dental arch, along with the morphology, did not harmonize. Due to the metallic abutment-stump structure on tooth 11, the central incisors were to be restored with new metal-ceramic crowns. In doing so, the red-white esthetic in the cervical area was to be restored with a ceramic shoulder. In addition, non-prep veneers had been planned for teeth 12 and 22 in order to level the contour of the teeth. The veneering porcelain VITA VMK Master was to be used for fabricating the crowns and veneers.
2. Comprehensive tooth shade determination
For systematic shade production, the base tooth shade and additional shade nuances and effects were determined in several steps. In the first step, the base tooth shade A1 was determined using the VITA classical A1-D4 shade guide and photographically recorded. Then, the VITA VMK Master LUMINARY and TRANSLUCENT shade guides were used to determine translucent color nuances and fluorescent effects of the natural dentition. Finally, the crowns on 11 and 21 were slit and removed following local anesthesia. The tooth stumps were prepared and shaped. A master model with fire-proof stumps on the lateral incisors were prepared. After scanning the model, NEM crown frameworks could be constructed on teeth 11 and 21 and ground with the Ceramill Motion 2 made of Ceramill Sintron (both by Amann Girrbach, Pforzheim, Germany).
3. Two types of restorations, one veneering system
The NEM crown frameworks were thinly coated with VITA NP BOND, which as a CTE buffer, enables a strain-free, durable veneering. For the wash opaque firing, VITA SPRAY-ON OPAQUE POWDER A1 (OP1) was also sprayed on. To control the fluorescence from the depths, the first dentine firing was performed with VITA VMK Master LUMINARY 1 (white) and 4 (light brown-orange). After this, the dentine core was anatomically reduced with layered A1 DENTINE and then individualized with TRANSLUCENT5 (T5: light blue) and with NECK 4 (N4: orange) in the area of the mamelons. The enamel fractions of the crowns were built up with a mixture of whitish ENAMEL 1 (70%) and neutral TRANSLUCENT 4 (30%). For the fabrication of the non-prep veneers using the layering technique, the ENAMEL and TRANSLUCENT materials were also used.
4. Characterization and finalization
After the second dentine firing of the crowns, they were finalized with fine diamond and rubber polishers and then characterized with white using the stains VITA AKZENT Plus EFFECT STAINS 01 (ES01) in the incisal area. Shade saturation was increased with ES02 (cream) and ES07 (khaki) approximally. After the stains fixation firing and the subsequent glaze firing with VITA AKZENT Plus GLAZE, final polishing was performed with a fine rubber polisher. The veneers were finalized in a similar way using stains and polishing. After the clinical try-in, the four restorations were fastened with adhesive. The veneer on the metallic crown frameworks and the non-prep veneers from VITA VMK Master were adhesively cemented onto the enamel and resulted in an overall harmonious result in the esthetic zone. The patient was very satisfied with the highly esthetic result.
Report 11/18
DT Marcio Breda, Vitória, Espírito Santo, Brazil
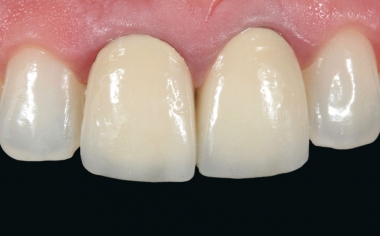
Fig. 1: Initially, the metal-ceramic crowns on teeth 11 and 21 showed esthetic deficits.
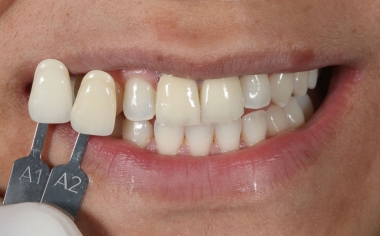
Fig. 2: The base tooth shade A1 was determined using the VITA classical A1-D4 shade guide.
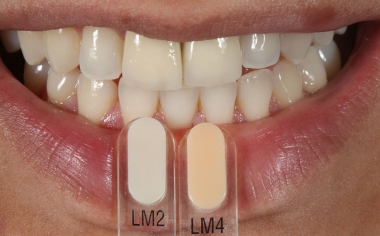
Fig. 3: The fluorescence effects were determined using the VITA VMK Master LUMINARY shade guides.
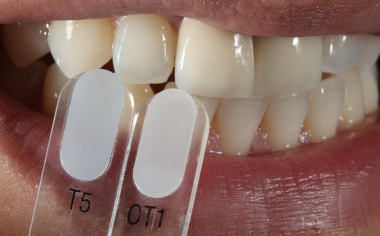
Fig. 4: The translucent shade nuances were determined using the VITA VMK Master TRANSLUCENT shade guides.
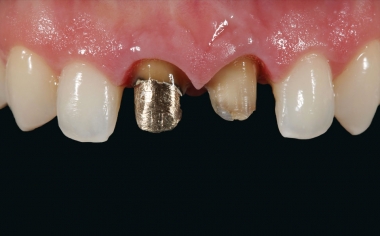
Fig. 5: Since tooth 11 had been restored with a metallic abutment-stump construction, we decided on non-precious metal crown frameworks.
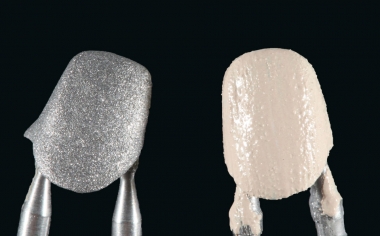
Fig. 6: The CTE buffer VITA NP BOND was applied to the non-precious metal substructure and fabricated with the support of CAD/CAM.
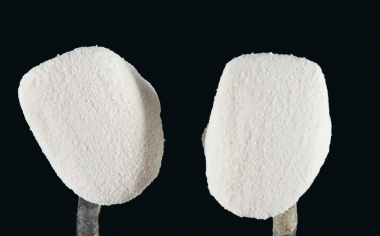
Fig. 7: For the wash opaque firing, VITA SPRAY-ON OPAQUE POWDER A1 (OP1) was also sprayed on.
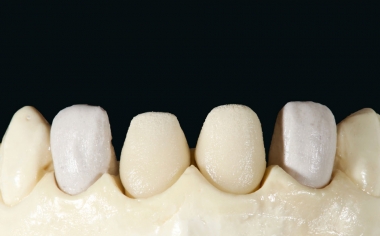
Fig. 8: The first dentine firing was performed with VITA VMK Master LUMINARY 1 (white) and 4 (light brown-orange).
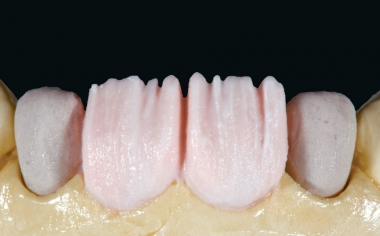
Fig. 9: The dentine core was anatomically reduced and coated with DENTINE A1.
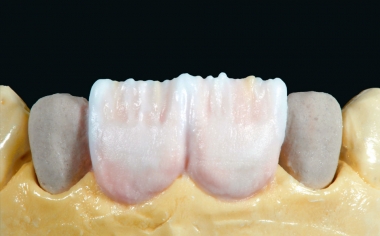
Fig. 10: Then it was individualized with TRANSLUCENT 5 (T5: light blue) and NECK 4 (N4: orange).
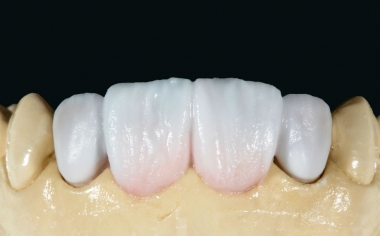
Fig. 11: The enamel was reproduced with a mixture of ENAMEL 1 (70 %) and TRANSLUCENT 4 (30 %).
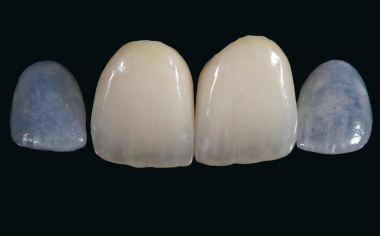
Fig. 12: The final result after further preparation, characterization and glazing with VITA AKZENT Plus and polishing.
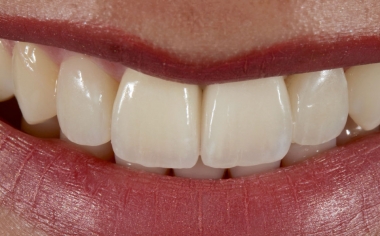
Fig. 13: The symmetrical edges of the incisors harmonized with the curve of the lip.
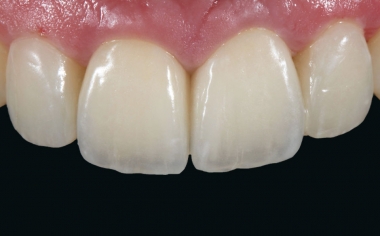
Fig. 14: The two different types of restorations showed lively light effects.
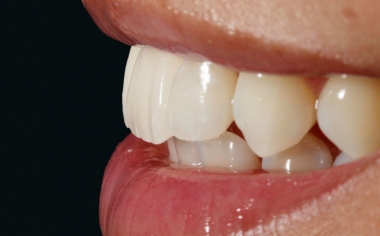
Fig. 15: Result: The lateral view showed a natural surface morphology.