
Lifelike Front Tooth Reconstruction Made of Feldspar Ceramics
VITABLOCS blanks made of feldspar ceramic have been proven millions of times since their first clinical use in 1985. The first generation of VITABLOCS were monochrome blanks designed primarily for inlay restorations. The next step was to develop polychrome blanks for esthetically pleasing monolithic anterior and posterior restorations. VITABLOCS TriLuxe forte (VITA Zahnfabrik, Bad Säckingen, Germany) have an integrated translucency and shade gradient in four intensity layers, enabling a natural play of shade and light in the esthetic zone. In the following clinical case, dentist Dr. Mon Li and dental technician Sally Hsieh show how these polychrome blanks can be used to achieve an individual shade and translucency effect.
1. Situation after root canal treatment
A 20-year-old patient came to the clinic because she was dissatisfied with the appearance of the middle left anterior tooth in her upper jaw. The clinical examination showed that tooth 11, which had been treated with a root canal, had darkened. During the radiographic check, a sufficient root canal filling could be diagnosed in the symptom-free tooth. Morphologically, 11 and 21 were symmetrical. After an in-depth consultation, the patient decided on a time-efficient, all-ceramic crown restoration made of the polychrome feldspar ceramic VITABLOCS TriLuxe forte in order to stabilize the tooth in the long term and meet her esthetic expectations.
2. Tooth shade determination
Correct tooth shade determination plays an essential role in the selection of the correct blank. For this reason, the tooth shade of the neighboring tooth 21 was precisely determined with the VITA Easyshade V spectrophotometer. Defined light was transmitted into the dentine core, the reflected reflectance spectrum was recorded by a measuring probe and the tooth shade 2M1 was determined in the device. Using the block mode in VITA Easyshade V, the suitable VITABLOCS TriLuxe forte could be determined at the touch of a button. In order to visualize the individual clinical situation in relation to the specific tooth shade, a digital photograph was taken with the corresponding shade tabs.
3. Scan and design
Before and after full crown preparation on tooth 11, the clinical situation was scanned with CEREC Omnicam (Dentsply Sirona, Bensheim, Germany). For the construction of the restoration using the software CEREC Premium 4.4.4 (Dentsply Sirona, Bensheim, Germany), the original morphology of 11 was copied. When the restoration was positioned in the blank, the translucency and shade gradient of the crown could be determined by vertical shifting and rotation. The crown was then fabricated in the CEREC MC XL milling unit (Dentsply Sirona, Bensheim, Germany). The morphology was finished with a fine round diamond.
4. Characterization and glazing
The monolithic crown was characterized with the VITA AKZENT Plus stains analogous to the natural neighboring tooth. EFFECT STAINS 05 (ES05, orange) increased the chromaticity in the cervical area. ES11 (blue) and ES13 (gray) were characterized for translucency effects in the incisal area. In the middle third of the tooth, a band with cream-colored ES02 was applied. After the fixation firing, the teeth were finally glazed and polished to a high gloss. The clinical try-in was successful, allowing the crown lumen to be conditioned with hydrofluoric acid and silane and the restoration to be fully adhesively fixed. The patient was pleased with the highly esthetic result in only one session.
Report 11/18
Dr. Mon Li, DT Sally Hsieh
CEREC Asia, Taipei, Taiwan
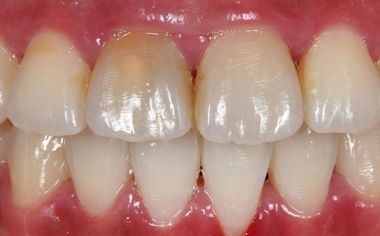
Fig. 1: Initial situation: The right middle incisor in the upper jaw, which had been treated with a root canal, had become discolored.
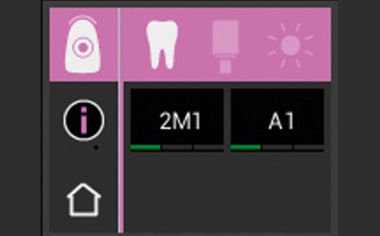
Fig. 2: VITA Easyshade V was used to precisely determine the tooth shade.
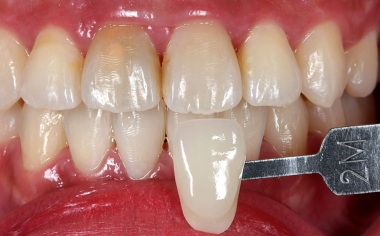
Fig. 3: A digital photograph with the corresponding shade tabs provided the dental technician with individual information.
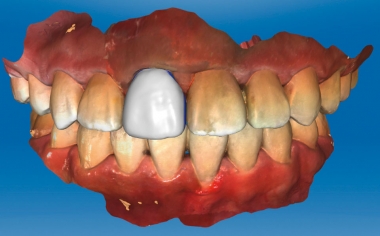
Fig. 4: The original morphology of tooth 11 was copied for the design.
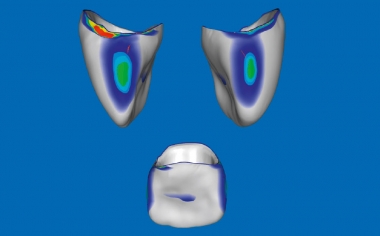
Fig. 5: In the CEREC Premium 4.4.4 software, the occlusal and proximal contact point areas could be modified.
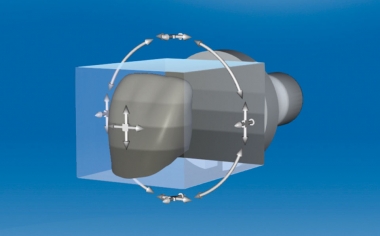
Fig. 6: The shade gradient and translucency can be controlled by positioning the restoration in the block.
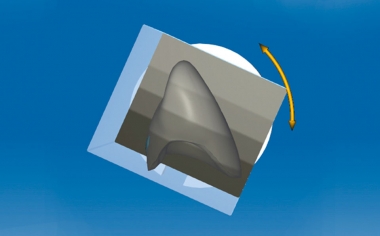
Fig. 7: The restoration can be more or less tilted for a smoother or more pronounced shade gradient.
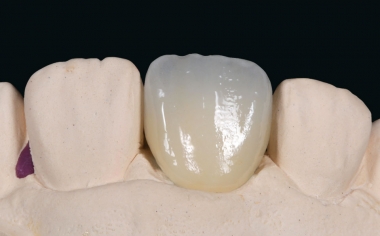
Fig. 8: The monolithic restoration already appeared completely natural on the model.
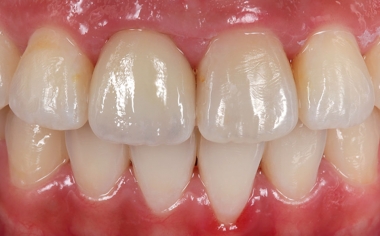
Fig. 9: The highly esthetic, monolithic result after full adhesive placement.
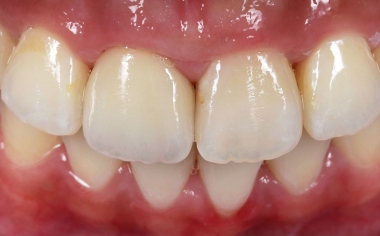
Fig. 10: Result: By positioning and rotating the crown in the multichromatic VITABLOCS TriLuxe forte, the translucency and shade gradient could be reproduced.