
True-to-nature, lifelike restoration with VITA YZ zirconia and VITA VM 9 veneering ceramic
For an individually veneered total reconstruction, a first-class esthetic and functional interaction of the framework and veneering material are required. Only if all the required material components are ideally matched to one another can the dental laboratory efficiently and reliably produce clinically stable and highly esthetic results. The prerequisite for this is that the manufacturer investigates in detail and systematically monitors the interaction of the components during material development and production. In the case of large-scale reconstructions, for example, it is important for the dental technician to be able to rely on a precisely calculated sintering shrinkage in all three space dimensions in order to achieve a high accuracy of fit. The veneering ceramic must guarantee a reliable bond to the framework and support a natural play of shade and light through its material composition. In the following, master dental technician Björn Czappa shows how he was able to create a highly esthetic, total reconstruction with the ideally coordinated framework and veneering materials VITA YZ and VITA VM 9 (both VITA Zahnfabrik, Bad Säckingen, Germany).
1. Initial Situation
A female patient in her late thirties presented in a dental office because she was dissatisfied with the function and esthetics of her dental situation. At the first inspection, the entire oral cavity appeared as a piecemeal of temporary work. The crowns and bridges showed no coordinated morphology. In general, the restorations were lifeless and their shades did not match. The gingival garland in the upper jaw had an uneven, asymmetrical gradient. After extensive consultation, the patient wanted full ceramic restorations. In the process, the lost bite height was to be restored. The patient rejected surgical measures to level the gum line in the upper jaw. For a sustainable, functional and esthetic result, high-strength, opaque zirconia VITA YZ T was selected for the framework, and the veneering ceramic VITA VM 9 was selected for the veneering.
2. Planning and clinical procedure
In the first quadrant, a crown block was planned at tooth 16 and 17 for added stability, from 13 to 15 a bridge and at 11, a single crown. In the second quadrant, a bridge was to be formed on the abutment teeth 21, 23 and 25. Single crowns were selected for teeth 26 and 27. In the lower jaw, the entire front could be left untreated, except for 33. In the third quadrant, the existing gap was to be closed with a bridge from 33 and 34 to 37. On the opposite jaw, a bridge was planned from 44 to 46 because tooth 47 was missing. After local anesthesia, the crowns and bridges in the upper and lower jaws were removed, and the new and old abutment teeth were put into the desired preparation forms. An impression was taken of the situation, and then the habitual bite was registered. The temporary new restoration was made using silicone keys from the initial situation.
3. Digital workflow and veneering
Master models were produced and articulated in the laboratory. Since the centric condylar position did not differ clinically from the habitual bite, the support pin and the bite were raised as well by 2.5 mm. This was followed by the digitization of the two models with the laboratory scanner (3Shape, Copenhagen, Denmark). When the zirconia substructures were designed with the CAD software, attention was paid to an anatomically reduced design for a uniformly supported veneering layer and maximized connector cross-sections in the bridge designs. After the frameworks were nested in the VITA YZ T disc in the shade LL1, they could be fabricated with the milling unit (Datron, Mühltal, Germany). Before sintering, the restorations were separated from the retaining bars and carefully finalized. The frameworks fit the master models precisely. The raised bite situation in the articulator was keyed with modeling plastic as a control during the framework try-in.
4. Efficient, highly esthetic layering
The frameworks showed a precise fit intraorally as well. However, the desired bite height with the key proved to be too high, which is why the support pin was slightly lowered again. The veneering began with a VITA VM 9 EFFECT LINER 4 washbake (yellow) to support the basic shade fluorescently from underneath. Except on the darker canines where BASE DENTINE A3 was used, the dentine body was layered with BASE DENTINE A2. In the incisal and cusp area, grayish-translucent EFFECT ENAMEL 11 and an alternating layer of MAMELON 2 (warm yellow brown) and 3 (soft orange) were used. A whitish-translucent strip was applied centrally with EFFECT ENAMEL 1. The final layer was done with ENAMEL light. The occlusal area was also individualized with orange EFFECT CHROMA 6. After the final firing, finishing and polishing, a highly esthetic result was revealed, which unfolded a lively dynamic of light after the final integration.
Report 07/19
Björn Czappa, Oldenburg, Germany
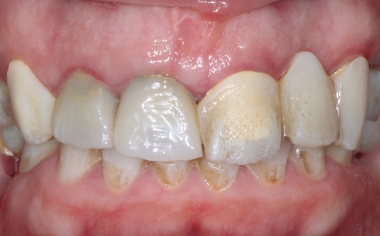
Fig. 1: The initial situation with multiple temporary restorations.
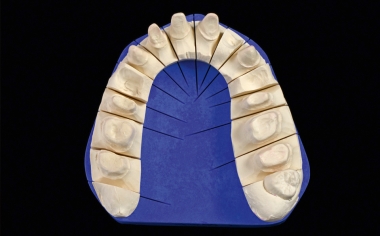
Fig. 2: Master models were created based on the impressions.
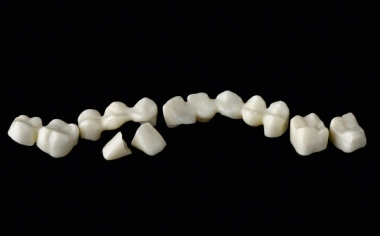
Fig. 3: The zirconia substructures with an anatomically reduced design.
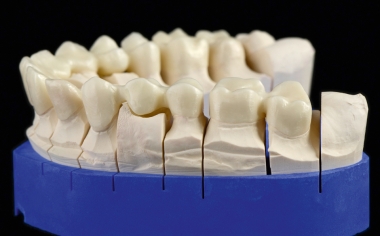
Fig. 4: The connector cross-section was chosen to be as large as possible.
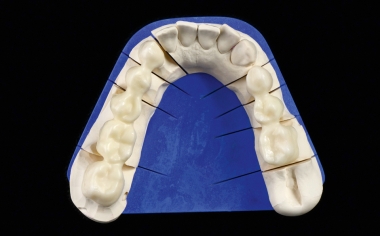
Fig. 5: The two bridge frameworks in the lower jaw prior to the framework try-in.
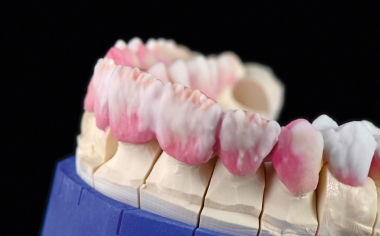
Fig. 6: Layering with EFFECT ENAMEL 11, MAMELON 2/3 and EFFECT ENAMEL 1.
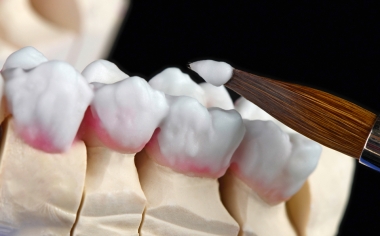
Fig. 7: The final layer was done with ENAMEL light.
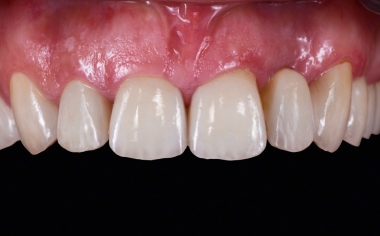
Fig. 8: Result: The restorations harmonized in shape and shade with the natural tooth substance.